


Overview
Supplies
Overview
Supplies
Overview
If you're going to tie yourself up, you're going to need some stuff! Building a rope kit for self-suspension is an investment – even if you make every attempt to be thrifty, you'll likely find yourself having spent at least $300 by the time you're done.
Supplies you're definitely going to need include:
- Rope! You'll need some to build harnesses that go against your skin, and some for uplines. Many people use the same rope for both, but in most cases I recommend against that for self-suspension – much more detail in the sections to follow.
- Climbing-rated carabiners (at least 4)
- A safety/cutting tool (check out this page and this page for lots of options!)
Some supplies that are more optional include:
- A ring, climbing plate, or other means of spreading out your carabiners at the top of your rig. If you use a large ring, this can also be a useful safety measure, as it gives you a place to hook an elbow (or knee) to take some tension off the ropes if you get stuck.
- Climbing straps – these are extremely handy if you suspend from beam-based points or truss. Usually 24 inches is a good size.
- A marlin spike
- A crash pad, or at least some sort of mat
- A rope bag (such as the MonkSak)
- A step stool, sturdy chair, or “apple box” – keep this close by while you're self-suspending so your spotter can pull it under you (allowing you to take some weight/strain off the rope) if you get stuck
- Appropriate clothing – generally, nude or a snug fitting top/sports bra (without underwires) works well on top, snug underwear/leggings (or nude) on bottom.
- A camera and spotter who's willing to take photos, or a selfie stick (there's no shame in my game, what can I say?)

Honey Bare
Self-suspenders answer the question: What is your favorite thing in your self-tying kit?
“Love/hate: My swivel. I love to spin, but my stomach hates it!”—Pendorbound
“My favorite thing in my rope kit is my rescue hook – I keep it on a lanyard around my neck. I occasionally forget to remove it... which has resulted in some interesting conversations!”—Joyous Purple
“I like to wear high socks, and use them to put stuff in – cutting tools, carabiners, ropes, etc.”—Ebi McKnotty
“My favorite thing so far has been the discovery of POSH rope for my uplines. It has made a huge difference in being able to change positions and hoist myself.”—Pam
“My favorite thing in my self-bondage “toolkit” is my self-tying playlists.”—Abbystract
Rope for harnesses
Rope for harnesses
Rope for Harnesses
Rope is the intuitive place to start building your kit, of course, and this is an area ruled by personal preference rather than any “twue way.” When choosing rope that you use to build harnesses against your body, you generally don't need to be as concerned with breaking strength as you do for uplines – I haven't seen incident reports where a fall was caused by rope in a harness breaking (the upline is what broke in every case report I know of). However, this applies to “standard” situations where you're evenly loading at least 4 (often 8) wraps of your harness. Be mindful of how you're attaching uplines – especially with futos, I've seen some designs that end up loading just one or two strands on the stem. While that could be OK as a secondary support, I don't recommend loading a harness that way for a critical line… and certainly not if the harness rope is unrated.

Using caution tape (which isn't rated, in case you were wondering) and other unconventional bondage material requires extra expertise, precautions, and risk aware practice. Photo from bondage performance event Twisted Windows.
While you don't have to worry as much about the breaking strength of your harness rope, obviously that doesn’t mean you could/should suspend yourself from rolled up tissue paper! If you're considering venturing beyond the basic rope types described here (suspending yourself with coconut rope or caution tape or whatever), seek in-person instruction from someone experienced with that specific material, and employ other safety measures (staying low to the ground, using a crash pad, etc).
If you ask people about what rope they use, you're likely to get a mix of rational and completely subjective responses: “I use hemp because it holds knots well… and because I get turned on by the way it smells.” Those subjective opinions matter! If you just plain like jute, and the reason why is “because I like it, that's why,” then that's rationale enough to use it for your harness building rope.
Experiment with different types of rope before investing in a huge kit of one specific material. This experimentation will help you with making an individual assessment of the pros vs. cons of different rope types, and weighing what factors matter the most to you. Personally, I have full kits of hemp, jute, and nylon, and switch between the three (or even – gasp – use more than one at the same time) depending on my evaluation of pros and cons of each material for the type of self-suspension I'm doing.
There are many rope options (cotton, silk, bamboo, coconut, etc), but I find that nylon/MFP, hemp, and jute are the “big three” that most people use for most applications. If you're interested in details on more obscure types of rope, I recommend this chart by Topologist.
All the photos below were shot by Stefanos, under identical lighting conditions so as to show the variation between different rope material as much as possible.
Hemp

Chest harness tied with 6mm Twisted Monk hemp
Breaking Strength: ~400-500lbs for 6mm (but note that this is an approximation – as a natural fiber, there will be inevitable variation and hemp rope cannot be reliably rated)
Pros:
- Relatively soft and flexible (although not as much so as nylon/MFP)
- Holds knots/frictions well
- Stays in place on the skin, creating distinct, textured rope marks that many people find aesthetically pleasing
- Requires less maintenance & lasts longer than jute
- Has a naturally sweet, earthy/grassy smell that many people find appealing
Cons:
- Somewhat difficult to wash/sanitize (follow instructions from the manufacturer), and weakens with washing
- Somewhat expensive
- Can cause reactions in those with grass allergies
- Can look somewhat dull and indistinct in photos, unless skillfully shot
- Decorative knots tend to flatten into an indistinct blob
Where to obtain it: I highly recommend TwistedMonk.com – use code "REMEDIAL" (for our bondage safety web site RemedialRopes.com) at check-out for $10 off orders of $75 or more!
Jute

Chest harness tied with 6mm Moco Jute
Breaking Strength: ~200-300lbs for 6mm (but note that this is an approximation – as a natural fiber with huge differences in processing and care, there will be inevitable variation, therefore jute rope cannot be reliably rated)
Pros:
- Holds knots/frictions well, although not quite as well as hemp
- Stays in place on the skin, creating distinct, textured rope marks that many people find aesthetically pleasing
- Lightweight (which makes it easy to carry around or travel with)
- Handles and flows well when tying
- More firm than hemp, and harsher/harder feeling against the skin
- Photographs extremely well, with no special lighting/skill required
- Makes “creaking” sounds that many people enjoy
Cons:
- Pretty much impossible to wash/sanitize (this matters less if you're just using it on yourself, but is still a consideration)
- Requires regular maintenance and has a relatively short lifespan
- Has a rough, hard feel against the skin (this could also be a pro, depending on your perspective!)
- Can cause reactions in those with grass allergies
- Often has a chemical smell, especially when new
Where to obtain it: I highly recommend Mocojute.com. Awesome product made by a fantastic bondage teacher and performer.
Nylon & MFP (these have similar properties)

Chest harness tied with 8mm nylon
Breaking strength: 1100-1500lbs (depending on diameter/material/manufacturer)
Pros:
- Soft, flexible, and extremely comfortable against the skin (this could be a con, depending on your perspective!)
- Comes in lots of bright, beautiful colors
- Relatively affordable
- Easy to wash/sanitize – put it in a lingerie bag with mild, color-safe soap, wash on a low/gentle cycle, then hang or tumble dry (no heat).
- Less likely to abraid skin in highly dynamic applications (such as marionette suspensions)
- Lasts a long time and requires basically no maintenance
- Can be used for water bondage because it doesn't shrink when wet (unlike natural fibers)
- Hypoallergenic
- Holds decorative knots and weaves well, without flattening/becoming misshapen
Cons:
- Slippery and doesn't hold frictions well
- Can burn with fast pulls against the skin
- Rope marks often turn out somewhat indistinct or bruise-y (this can be mitigated a bit by choosing twisted instead of braided rope)
- Has some stretch, which causes harnesses to lose shape and pull away from the body.
Where to obtain it: I highly recommend KnotHead Nylon!
Other Rope Properties
Other Rope Properties
Rope properties to consider
Thickness
As with rope material selection, picking the diameter of rope you want to tie with is all about achieving a balance between the pros and cons. Thicker rope spreads load against more surface area, which will (up to a certain point) make bondage more comfortable and even safer. However, rope also becomes stiffer as it gets thicker, and knots formed with thicker rope can get bulky, which also becomes a safety hazard by creating a large area of uneven pressure (in addition to looking sloppy).
For most purposes, 6mm (¼ inch) diameter rope provides an optimal balance. It's thick enough to provide a reasonable amount of support against the skin, while not being too bulky or stiff to form bends and knots. You might use smaller diameter for applications like genital, face, and hair bondage. Many people who use jute get 5mm instead of 6mm, as they feel it offers superior handling. If your bondage is knot-centric, you probably don’t want rope thicker than 6mm. On the other hand, if your bondage focuses more on weaves and doesn’t use many knots, 8mm rope might work well for you.
There are a few instances where I use 8mm nylon – if I'm going for extra comfort or tying a larger bodied person, I use 8mm nylon for chest and hip harnesses. I love using 8mm nylon to build gravity boots, as I find it increases the comfort significantly over smaller diameter nylon, and is exponentially more comfortable than natural fibers for this application. The biggest problem with thicker rope is that it creates very bulky knots, and the bulk works with the slippery nature of the synthetic rope to make it quite easy for knots to come loose. This is less of a problem with natural fibers, of course, however I find 8mm hemp very clumsy feeling, and don't personally use it.
Lengths
The most common lengths you might find for sale are 7 or 8 meter (more traditional for Shibari-style tying), or 15 and 30 feet (more common in the US). There are a few individuals I've tied where it seemed like 30 feet was a magic length that was always exactly right for harnesses on their bodies (generally these people are petite women… it’s almost like that’s who Shibari ties were designed for…). For me, I have found 30 feet is exactly wrong pretty much 100% of the time – my “magic” length is closer to 35 feet.
You don't want your rope to be too long, because it is clumsy and time consuming to pull long lengths through your bondage to form knots and tensions. Having 50 foot lengths of rope flying around you is also a good way to get tangled, hit your neighbor at the next play station, or have your rope stepped on by a clueless bystander. Combining rope multiple times to build a harness can also be problematic – you have to consider where those knots from combining rope will end up, because they can be uncomfortable (even unsafe) in parts of your harness that will be heavily loaded or if they end up pressing right into a nerve bundle. And random-looking knots and ends hanging from rope adds tend to make your bondage look a bit sloppy.
Part of the joy of self-suspension is that when/if you settle on specific ties that you do frequently (for me, a swiss seat hip harness and three-wrap gravity boot), you can make yourself a custom kit with lengths of rope that are just right for that tie on your body. I love never having to worry about killing an extra, awkward 2 feet of rope… or being just a few inches short of finishing a tie.
Color
Of course you want to pick a color you find aesthetically pleasing, but there's a bit more to the decision about what color rope to buy than that. Black or very dark colored rope is very tricky to use in classroom or teaching environments (if you are trying to teach a tie, or are in a class and the instructor is trying to check your bondage) as the dark color makes it much more difficult to see the knots and tensions. So if you anticipate that you’ll be using rope for classes, natural colored or lighter shades will probably be a better choice. Also, exact color matching across different manufacturers (or even the same manufacturer years down the line) may not be possible, so if/when you’re ever looking to replace just one piece of your red rope, you may find it impossible to get a perfect color match.
Rope Ends
I strongly prefer whipped or taped rope ends; I have a difficult time working with knotted ends. While knots can be handy for combining rope, they have a tendency to get caught when pulling through hitches, and can make bondage more time-consuming to untie. Some vendors (such as Twisted Monk) whip the rope for you; you can also learn to whip your own rope – there are multiple different techniques and many youtube videos that can lead you through it!
If you want to finish your rope ends with tape, my preference is cloth medical tape (look in the same aisle as band-aids at the store), because it has a soft texture that blends into the rope. Electrical tape also works, but of course has a more plastic-y feel.
Rope for Uplines
Rope for Uplines
Rope for Uplines
Unless your specific kink is “risking debilitating or deadly falls due to hanging yourself from the ceiling with woven grass clippings,” I simply don't see any reason to not use rated rope for your critical uplines. Self-suspension involves many unavoidable risks, but weak upline material seems to me like an imminently avoidable one. More about why I feel so strongly about this can be found here; for another perspective on support line selection and material I recommend this article by Topologist.
To quickly define terms, critical uplines (sometimes called "main support lines") are the lines that are keeping your head from rapidly and unceremoniously meeting the ground. For secondary lines (adding support for a foot, when you already have the chest and/or hip harness secured) or other non-critical applications, using whatever you use for your harnesses is fine. For keeping your brain and spine intact, a higher safety standard is called for.
A safety margin of 10 times the weight of the person being lifted is pretty standard for rescue, construction, and professional rigging involving lifting humans (such as circus apparatuses). This seems like a reasonable standard to carry over into suspension bondage.
You’ll often see rope listed with a “breaking strength” and a “working load.” To quickly define terms, “breaking strength” is exactly what it sounds like – this is the amount of weight that causes the rope to break. “Working load” means something quite different – this is the amount of weight that the rope can support, with a safety factor already built in. Keep in mind that knots weaken rope, and when lifting into suspension, especially doing stunts like drop lifts or other dynamic maneuvers, you will routinely apply much more force to the rope than your weight. Additionally, “working loads” for rope intended for non-human use may only include a safety factor of x3 to x5, rather than the x10 standard for human safety.
There are many documented cases of 5mm or 6mm jute uplines breaking during suspension; there are also documented cases of 6mm hemp uplines breaking. I have not personally heard a case of 8mm hemp uplines breaking, therefore if you really must use all natural fibers in your rope kit, 8mm hemp is what I would recommend for your critical uplines. Personally, I find it bulky, stiff, and difficult to manage… why struggle with it when there are so many wonderful options for rated rope?
Some in the bondage community have expressed concern about synthetic uplines melting in certain bondage situations, such as with high friction or when exposed to bright stage lights. While it is possible to break cheap synthetic rope with friction, practically speaking, this is not an issue for the high-quality synthetics I’ll be discussing here. If you have concerns, test your rope by making a static loop (around your foot or through your point) and vigorously rubbing a length of the rope back and forth through that loop. Cheap nylon rope or paracord can rather easily be cut this way; in my trials with all the materials listed here, I’ve only seen a very slight amount of melting/flattening, and only after extremely vigorous rubbing of a sort that would be impossible to achieve in a realistic bondage situation. Even then, it didn’t seem to alter the structural integrity of the rope in a meaningful way.
A standard length for uplines is about 30'. While this can seem like a lot of rope, the idea is to have enough line to lower yourself (or be lowered) to the ground, if needed (for example, if you passed out), while maintaining a 3:1 pulley. In some of the below pictures (like the nylon), my rope is shorter (in that case, simply because I don't actually use nylon for uplines and don't have 30' lengths). I do in fact use shorter lengths of amsteel for uplines because amsteel is close to useless for pulleys, anyway – it is ridiculously slippery and almost impossible to grip under load. When I'm using amsteel, I'm making the decision to prioritize that aesthetic over the safety considerations for an upline like a 30' piece of POSH, and I have alternative "emergency exit plans."
POSH (6mm)

6mm POSH upline (30' length)
Breaking strength: 1200lbs
Pros:
- Fits in reasonably well with natural fiber rope (can generally be purchased in a natural light brown color or black)
- Has a good “hand-feel” – comfortable for gripping and lifting
- Machine washable/dryable (see “care” section below)
- Holds frictions reasonably well
Cons:
- Somewhat stiff, which can occasionally make it more prone to jamming (this is especially noticeable when the rope is new, it does break in with use and can be put through the wash to speed up this process)
- Has a hard feeling against the skin, and therefore isn't optimal to use for harnesses
- Occasionally has manufacturing defects that show as bulges along in the strands—I'm not sure how this would impact the strength, but if I see visible issues I discard the rope
Where to obtain it: Twisted Monk carries this as part of their “Stefanos & Shay kit” or for individual sale. It can also be found at rwrope.com and other boating supply outlets
Amsteel (⅛ inch)

4mm Amsteel upline (20' length)
A note on thickness: I generally use ⅛ inch (which is about 4mm) thickness amsteel. I find that thicker amsteel becomes more unpleasantly wire-like (this rope was created to replace wire in some types of pulleys), and magnifies the “cons” of this material without adding any “pros.” Amsteel is already ridiculously strong, so the extra strength that comes with thicker rope is in this case irrelevant.
Breaking strength: 2300lbs (size for size, amsteel is the same strength as steel)
Pros:
- Very lightweight
- Thin and soft feeling
- Modern, minimalistic, distinct look
- Durable and very wear-resistant, even in high friction applications
- Useful for uplines that you will not be adjusting (raising or lowering) during your suspension. For example, I use it to tie off my lines for my “triangle” suspension and when I tie 2-point dynamic suspensions.
- Because it is so thin and strong, it lends itself to unique performance applications – I’ve done a performance where I laced my boots with amsteel, then unlaced them and used my “shoelaces” as uplines.
Cons:
- Terrible hand-feel – if you attempt to lift yourself using amsteel, it will bite into your hands like wire, while also trying to slip through your grip.
- Extremely slippery and doesn't hold frictions
- VERY prone to jamming and therefore requires special tie-off techniques
Where to obtain it: Westmarine.com and other boating supply stores
Regatta braid (6mm)

6mm Regatta Braid upline (approx 35' length)
Breaking strength: 1900lbs
Pros:
- Wonderful hand-feel – it has a textured surface that grips comfortably and doesn’t slip through your fingers
- Hold knots and frictions reasonably well
- Soft and flexible
Cons:
- Doesn’t fit in with any sort of rope kit, and most people don’t consider it aesthetically pleasing, especially in photographs (I’ve tried to dye it to make it look a little better, but it didn’t hold the dye at all, unfortunately)
- Somewhat bulky and heavy
Where to obtain it: Westmarine.com, New England Rope, and other boating supply stores. This is the upline material commonly recommended by Suspended Animation, an excellent organization based in Seattle.
Nylon &
MFP

8mm Nylon upline (approx 20 foot length)
Breaking strength: 1100-1500lbs (depending on diameter/material/manufacturer – I generally use 5/16” MFP from Venus Rope, which has a working load of 240lbs)
Pros:
- If you’re using nylon/MFP for your harnesses, the fact that you can also use it for your uplines gives a consistent look and can be aesthetically pleasing. This is the only material I’d use for both harnesses and uplines.
- Soft and flexible
Cons:
- Very slippery and doesn’t hold frictions or knots well
- Prone to jamming
- Can burn as it passes through your hands or next to your skin
Where to obtain it: VenusRopes.com, Knotheadnylon.com, many other vendors
Of course, there are other possible upline materials – this chart by Topologist goes through the properties of some other options. An acceptable synthetic you might sometimes see is Hempex — I find that this rope started gaining popularity before POSH came onto the scene, and most people have moved away from it and toward POSH. 6mm hempex has a breaking strength of 1100lbs, so it is plenty strong. However, in my opinion it is inferior to POSH in pretty much every way. It tends to have a fuzzy appearance and can feel "splinter-y" in your hands, it isn't as comfortable to use for pulleys, and it tends to look quite distinct when compared to hemp or jute, especially in photographs.
There are also people making reinforced jute – every manufacturer is different, therefore I don’t feel comfortable recommending or making generalized statements about this type of upline.
This article goes into more detail about the process involved in deciding how to tie off your critical support lines, because while rated rope is important, it's only one "link" in the safety chain (and doesn't do you any good if it's tied off insecurely).
Carabiners
Carabiners
Carabiners

Petzl William Screwgate Locking Carabiner. You can see the rating information (kN) on the spine (left).
Carabiners are a crucial part of your self-suspension kit. I recommend having at least 3, perhaps 5 or more. Carabiners are used to keep your uplines separated and organized, and to build pulleys for lifting. Using a carabiner rather than simply going through your rope bite or hanger and using that as a pulley decreases friction (allowing you to pull up more weight more easily) and is also safer, as rope-on-rope friction can wear down your rope and even cause rope breaks.
Carabiners also provide a “quick release” – there are many situations where unclipping a carabiner is faster than untying, and even faster than cutting rope. This can be a useful safety measure, especially when it allows you to quickly detach non-critical lines. However, in most cases it is safer to lower yourself to the ground slowly than to unclip (or cut) a critical line.
There are many factors to consider when picking carabiners. Always use climbing rated carabiners, never carabiners from a hardware store. Climbing carabiners will always list their ratings on the spine, so they’re fairly easy to identify. Ratings are listed for both gate closed (much stronger) and gate open (much weaker). If a carabiner doesn't have this info on the spine, it is not appropriate to use for suspension.
Shape

Different sizes/shapes of carabiners (pack of cards for scale). From the left: 1) "Big Wall Traverse" brand small pear shaped screw gate carabiner. Not recommended for most applications as the smaller size and steeper slope makes your rope more likely to jam. 2) "Black Diamond Rocklock" pear shaped screw gate carabiner. Note the gentler slope than 1. This is the shape of carabiner I prefer for most applications. 3) D-shaped screw gate carabiner. Good for hanging your ring/spinner, not for much else. 4) Oval shaped carabiner without locking gate. Because it does not lock, this one is useful only for non-critical lines (although it is a climbing rated carabiner). Oval shaped carabiners (with locking gates!) are OK for hanging your points (but not as good as D-shaped carabiners) and OK for running pulleys with your rope (but not as good as pear-shaped carabiners).
Carabiners come in a number of different shapes – ovals, D-shaped, and pear-shaped – and there are variations within these shapes, as well. For hanging your ring from a hard point or attaching your ring to a spinner, you ideally want a D-shaped carabiner (although an oval or pear shaped one will work fine). This is because carabiners are strongest along the spine, so you want to arrange them so most of the weight is oriented there. When you’re attaching a spinner or cargo strap to a pear shaped carabiner, it doesn’t load as directly on the spine as it would in a D-shaped carabiner, and it can also allow some back-and-forth movement that can feel insecure and alarming (as well as making unfortunate clicking sounds).
For pretty much everything other than attaching rings/spinners to each other or a hard point, pear shaped carabiners are optimal. You want to look for a roomy pear shape without a steep “slope” – a more rounded and gradual curve gives you space to form a pulley, and won’t cause your rope to overlap on or under itself and jam. You also want to check that it has a gently curved “lip” (the surface on the inside, where your rope will be rubbing) – some smaller carabiners have quite a small lip, and this can cause additional strain on your rope.
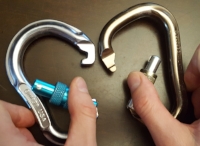
The carabiner on the left has a "tooth" while the one on the right does not.
You want to look for carabiners that don’t have a “tooth” on the gate, as this will catch on your rope. Most new models of carabiners are toothless, but it’s something to check. You want large sized carabiners, and this can be impossible to tell if you’re buying online (unfortunately, they don’t seem to list sizes). The more room you have on the inside of the carabiner, the less chance that your rope will cross under itself and jam up.
It is very hard to evaluate carabiners over the internet. You may want to go to a climbing store to actually get your hands on specific carabiners and see the sizes for yourself, rather than ordering online (at least until you know exactly what you want).
Lock style

The carabiner on the left is a twist auto-lock, the one on the right is a screw lock.
Self-suspension is often quite dynamic, and for dynamic applications, using locking carabiners for main support lines is important. For static suspension, non-locking carabiners (such as wire-gate ones) are adequate… but most self-suspension involves moving around in rope, so I suggest investing in adaptable, high-quality equipment from the start. Carabiners that don’t lock can accidentally and suddenly come unclipped due to pressure from the rope inside the carabiner, sudden movements, or colliding with other components of your rig (such as the suspension frame, a body part of the suspended person, or another upline).
I have personally seen an non-locking carabiner come unclipped from five of the 6 rope wraps it was clipped around during a transition/drop – the bottom was very fortunate that it happened to catch on that last wrap, and they didn’t fall onto their heads, although the uneven and severe pressure on a single 5mm strand of rope caused bruising that lasted almost a month. There have been other rope incident reports of accidents caused by non-locking carabiners, as well.
There are many different types of locking carabiners available. I personally prefer a screw-lock, but plenty of people hate screw-locks and prefer twist locks (sometimes called “auto-locks” because they default into their locked position when not being held open). There are also ball locks and a number of other fancy mechanisms. The choice is mostly personal preference. Many people just build their motor skills around whatever type of lock they are first exposed to, and “imprint” on that type of mechanism for the rest of their bondage career. The reason I prefer screw locks probably isn’t any more sophisticated than “it’s what I got used to using when I first started.”
I recommend going to a climbing store, playing with a few different types, and seeing what feels good in your hands. Twist locks have the advantage that you can’t forget to lock them, because they spring into a locked position automatically. If you use screw locks enough, you eventually will forget to lock one. However, getting a twist lock open and holding it open can be difficult (especially if your grip strength is almost burned out).
Models that I prefer at this time are the Black Diamond Rocklock Screwgate Carabiner and Petzl William Locking Carabiners (which I especially like because it shows a red stripe if the carabiner gate is unscrewed). Note that models change and are updated constantly. Expect to pay $10-$20 per carabiner.
Clothing
Clothing
Supplies for being in rope

Performing at Seattle Erotic Art Festival. Leggings from here :-)
While most of this chapter involves rigging supplies, there are also supplies you will want that have to do with being in rope. These also apply to rope bottoms!
The first thing to consider is what you’re wearing. Generally speaking, you either want to be nude, or wear snug fitting clothing that doesn’t have embellishments like buttons, zippers, jewels, underwires, fringe, etc. Rope over any of those can cause a focal area of compression, which can be uncomfortable and also potentially unsafe. Additionally, tying over clothing that is loose or has an uneven surface can be a miserable experience, as the clothing keeps getting caught in your rope as you’re pulling it through. The worst is fishnets!
Nudity or snug fitting clothing both have their advantages and disadvantages. Rope, especially natural fiber, will “grip” better on bare skin – this can make a huge difference for tension-based ties that are prone to slipping, such as bent leg ties (futos). However, clothing can provide a bit of protection for your skin. This is especially true in situations where you will be very dynamic in the rope, which can cause rope burn or shearing type forces – slippery leggings can be helpful here, because they give the rope just a little bit of “play” over the body without causing abrasions on the skin. Keep in mind that generally speaking, you want your rope harnesses to be tight and secure – if it’s slipping around and giving you rope burn, that can be an indication that you’re not tying with appropriate tension. However in highly dynamic ties like “puppet” suspensions, or when you intentionally want the rope to slide (moving a thigh cuff down to an ankle, for example), rope movement against the skin is inevitable and slippery leggings will significantly enhance your comfort.
Of course, the nude vs clothed decision also has to do with your comfort level, environment, personal preference, and many other factors.
If you want a more "sticky" legging that is closer to bare skin, look for cotton leggings. I tend to go the opposite direction and like slick leggings – in the past I have generally ordered from stores like Black Milk, Living Dead Clothing, and Poprageous. Their leggings are a bit more expensive, but they are ethically made and much better constructed and durable than those you'll find on Amazon for $10. Cheap leggings often have bulky, rough seams in annoying locations, making them much less than ideal for suspension. I highly recommend this site for some awesome, high quality and unique leggings, which also support an amazing independent artist!
In addition to clothing, other “being in rope” supplies to consider include:
Something to drink (water, gatoraid)
A blanket or robe to wear when you come down
Any medical supplies that are relevant to you (inhaler if you have asthma, glucose tablets if you have diabetes, etc)
Bandaids (these are helpful from both a tying and being tied perspective – I commonly catch hangnails on my rope and find myself bleeding while self-tying)
A light snack (banana, cereal bar, etc)